|
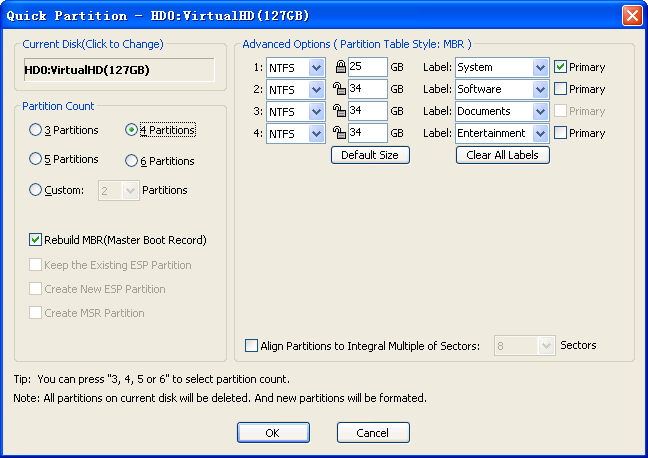
Quick Partition This function is for quickly re-partitioning hard drive and formatting all its partitions in one step. It's a convenient way to partition new disk or radically re-partition a disk which already has useless partitions. It will delete all existing partitions after completing this operation. Then the disk will be partitioned and formatted as your instructions. You can specify the partition size, the file system type and the volume name etc. Only a few simple settings is required to re-partition and format a disk if you do not accept the default settings. That is, if you do not want to change the default partition count, type and size, just open the Quick Partition dialog by press F6 key and then click the "OK" button, the disk will be partitioned and formatted rapidly. we called it "One Step Partition". To start quick partition, press F6 key after a disk is selected. Or just click "Quick Partition" menu item from "Disk" main menu. PartitionGuru will show you the following dialog box:
By default, PartitionGuru will automatically choose the current disk as the target disk to quick Partition. If the current disk is not the disk you want to do this operation now, please click the disk name on the top left corner of the dialog box. PartitionGuru will popup a window for choosing the target disk to be one step partition. 1. Specify partition count: While the dialog box is open, the number key of "3", "4", "5" or "6" can be used for directly specifying the partition count other than by mouse click. After the partition count is specified, the right half of the dialog box will immediately list the partitions accordingly. The default partition count is determined by disk capacity. As the following:
2. Specify partition parameters: The basic parameters of each partition is shown on the right half of the dialogue box. The parameters include partition size, type, volume name and whether is primary partition or not. You can adjust each of them as per your personal needs. The following shows some detail introductions for adjusting partition parameters: 1) Partition Type: The "One Step Partition" function support two kinds of
file system types for choosing, they are NTFS and FAT32. On the left of the partition size edit box, there is an icon looks like a "lock". When you changed the size of a partition, the partition size will be "locked". When the size of other partitions changed, the locked partition size will not be adjusted automatically. But you can change the locking state freely by click the icon. When initializied or the number of the partitions changed, the first partition will be locked while others not. When you change the size of one of the partitions, the other unlocked partitions will automatically averagely distribute the remaining space. If all partitions except the one under changing were in lock state, only the first or the last partition size will be adjusted. And the final one to be adjusted is according to the sequence of the latest changing. If the latest changing was done on the first partition, the last partition's size will be adjusted automatically, and vise versa. The adjusted partition will be unlocked automatically. When you click the "Default Size" button, PartitionGuru will reassign the partition size by the default rules mentioned above. All partitions created by "One Step Partition" function will be "Integral Size Partition" except the one use the "remaining space" of the disk. The size of a "Integral Size Partition" will looks more beauty while it was shown in the Windows Explorer. The picture bellow shows an example of "Integral Size Partition" and normal partition displayed in the Windows Explorer: Integral Size Partition: 3) Volume Label: PartitionGuru assigns each partition with a default volume name. You can choose or change them yourself. And all the partitions' volume names can be cleared up by click the " Clear All Labels" button. 4) Primary Partition or Not (This option is invalid for GUID partition table): It is allowed to choose one partition as primary partition or logical partition. This can be done by checking the related checkbox on the right. There maximum 4 primary partitions are allowed for one disk. If there are more than 4 partitions, the excess must be assigned as logical. PartitionGuru will automatically adjust the situation of this option to be checked or not according to your selection. 5) Align Partitions: For some disk, for example Western Digital's Advanced Format hard drive with 4KB size physical sectors, the partition should be aligned to 8 sectors to ensure it provides full performance. In this condition, you should select "Align to Integral Multiple of Sectors" option and select a required number of sectors for aligning. 3. Other settings: 1) Rebuild the Master Boot Record (MBR). This is a default option. If there is a MBR based booting manager program installed on the disk, and it must be kept for later use, please do not check this option. 2) GPT Disk: The "One Step Partition" function also can be used for create GUID partition table for a disk. On the right top of the Dialogue Box of Quick Partition function, besides the "Advanced Options", the partition table style ("MBR" or "GUID") of current disk is displayed. In addition, for GPT disk, you can also choose the option of the ESP and MSR partition. If the ESP partition is already exist, you can choose " keep the existing ESP Partition" or "Create new ESP partition". When all the settings are well adjusted or the default settings are acceptable, click "OK" button to execute the Quick Partition and Formatting operations. If there are old partitions in the disk, PartitionGuru will show the following message box:
After Quick Partition completed, all the original partitions (if there were any) will be automatically deleted. The first new primary partition will be automatically activated. |